Quick Start Guide
This page offers a quick start guide to help you become familiar with all the key navigation points on the site.
Check the live version at Deployed Site.
1. Common
1.1 Navigation
Use the top navigation bar to move between pages and access settings:
- Select your preferred language.
- Switch between light and dark theme for optimal readability.
- Monitor your cart icon to see the current item count.
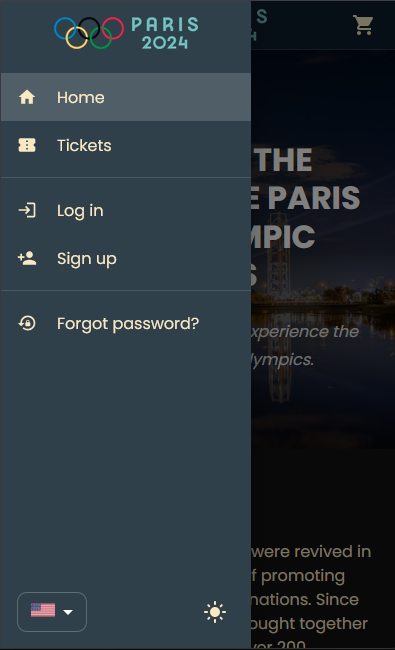
- On mobile, tap the menu icon to open the drawer navigation.
- Scroll down to reveal the “Back to Top” button in the bottom right corner.

1.2 Header & Footer
The header shows links to Home, Offers, Cart, and access.
The footer provides quick links to legal pages (Terms, Privacy, Imprint) and the Contact page.
1.3 Home
The homepage welcomes everyone with an overview of upcoming events and a prominent call-to-action to view offers.
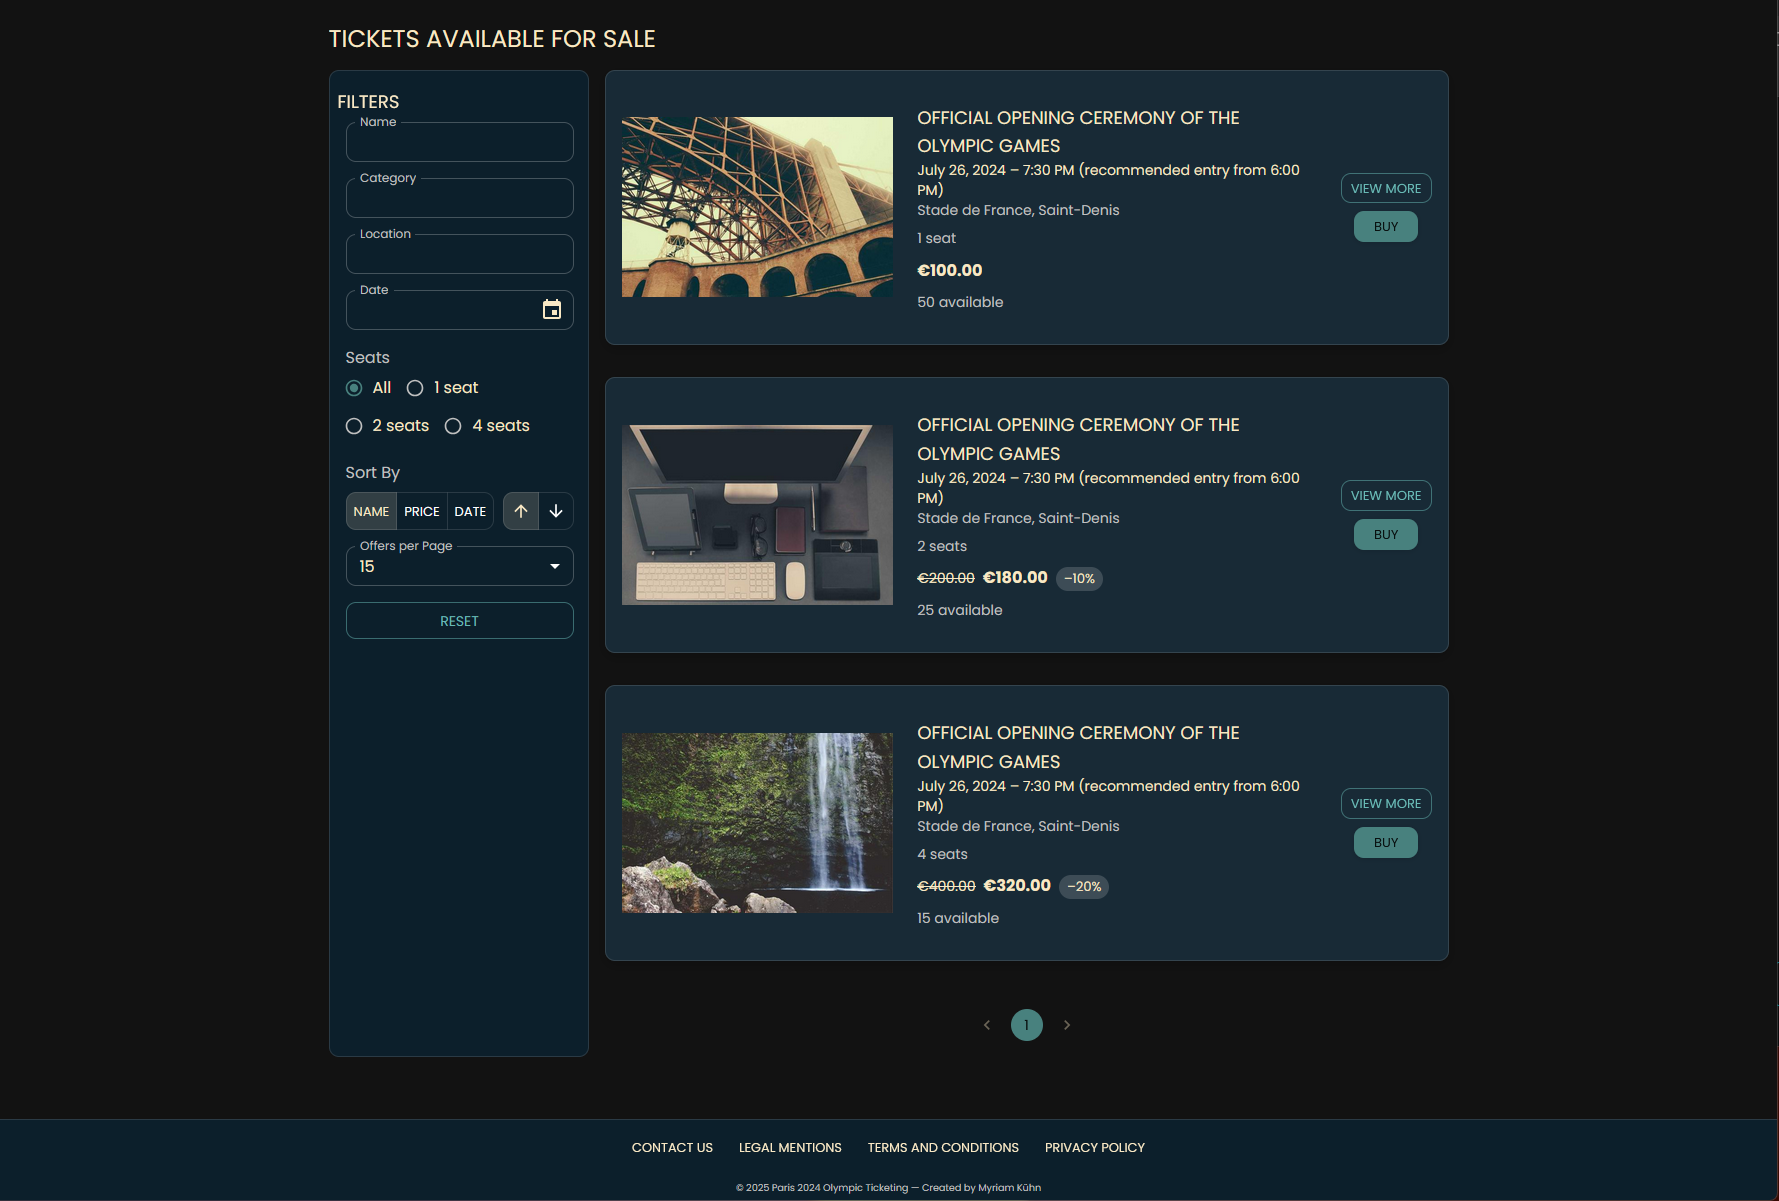
1.4 Offers
Browse all available offers complete with images and key details.
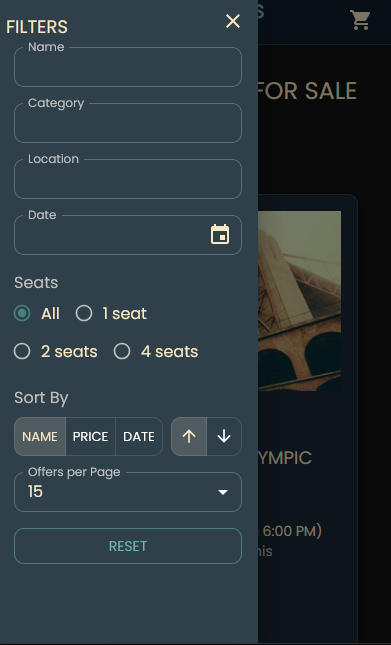
Use the filters sidebar to narrow results by date, category, or location.
Click “More Info” on any offer to open a detailed preview window.

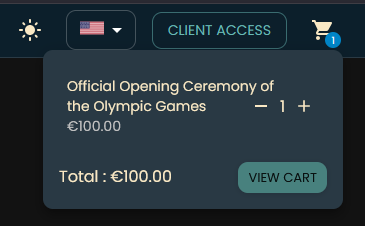
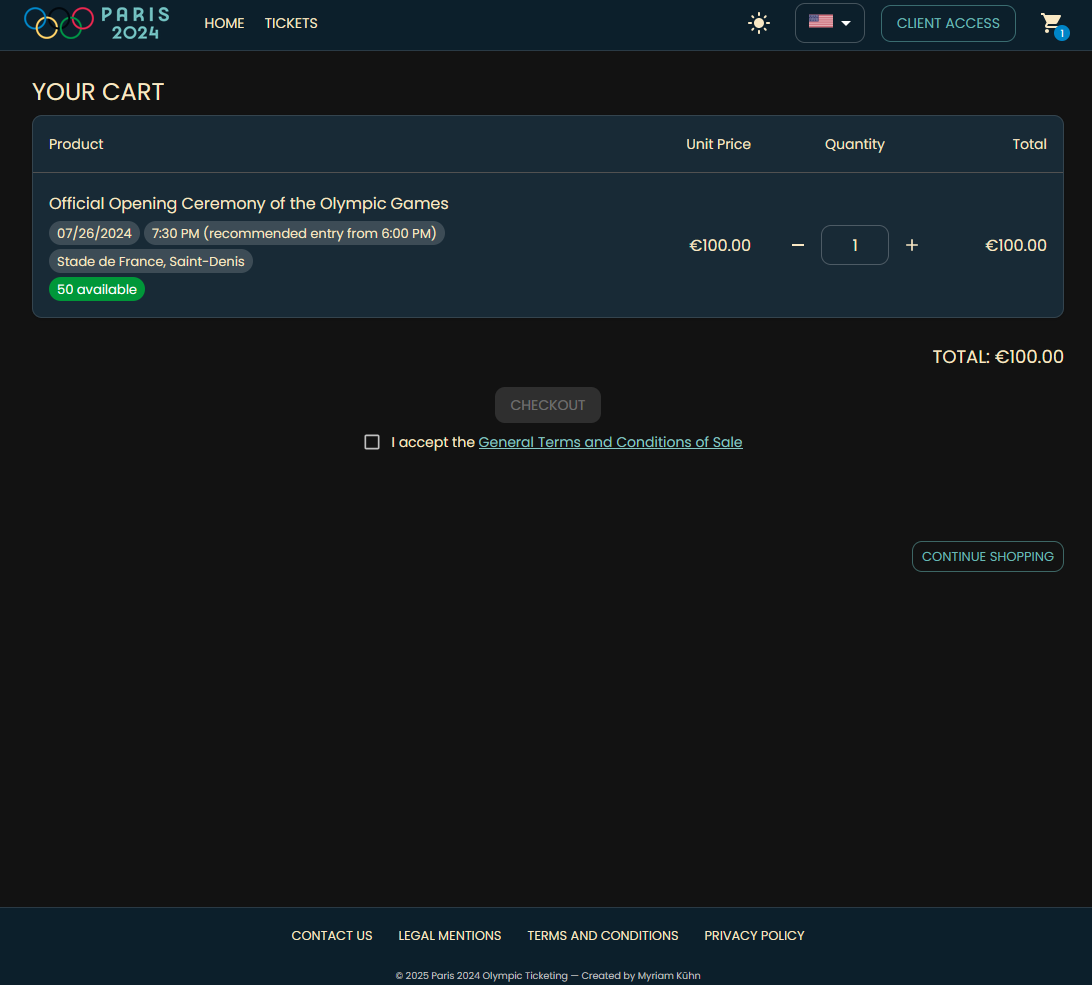
1.5 Cart
View and manage items in your cart from any page.
1.6 Legal & Contact
Access our Terms of Service, Privacy Policy, and Imprint in the Legal section. Please review them before ordering.
Visit the Contact page for support and inquiries.
2. Visitor
2.1 Cart
As a visitor, you can browse offers and add items to your cart, but you must be logged in to complete a purchase.
If you click “Checkout” without being logged in, you will be redirected to the login page. After signing in, you will automatically return to your cart to proceed.
On login the guest cart will automatically merge with the user cart, so no product is lost by logging.
Visitors can only explore offers and add items; ordering requires an account.
2.2 Registration
Click the “Register” button in the navigation bar or on the login page to create an account.
Fill in your details and submit the form. You will receive a verification email.
Your password must have at least 15 characters, one uppercase letter, one lowercase letter, one number and one special character.
Click the link in the email to activate your account.
If you don't receive the email, check your spam folder or try to log in and the email will be resend automatically or you can click “Resend Verification” on the login page.
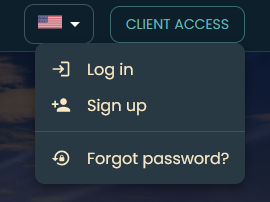
2.3 Login
Click the “Login” button in the navigation bar to sign in.
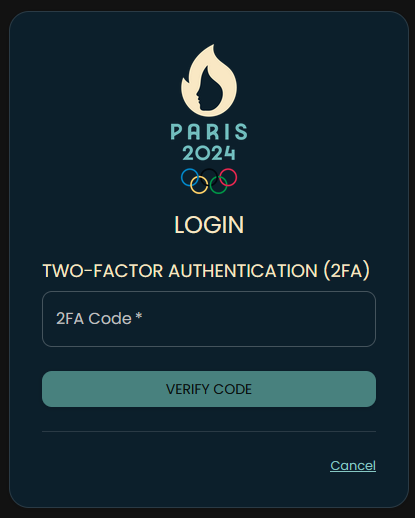
Enter your registered email and password. If two-factor authentication (2FA) is enabled, enter the code from your authenticator app.
Once logged in, you can access your profile, your tickets, your bills and complete purchases.
Don't have an account? Register first to proceed.
2.4 Forgot Password
Click “Forgot Password?” on the login page or in the navigation and enter your email to receive a reset link.
Follow the instructions in the email to set a new password.
If you don't see the email, check your spam folder or contact support.
3. User
3.1 Sign In (with optional “Remember me” and 2FA via Google Authenticator)
As a registered user, you can log in to access your profile, manage your orders, and complete purchases.
Click the “Login” button in the navigation bar or on the login page. By checking “Remember me”, you will stay logged in for 7 days.
Enter your registered email and password. If two-factor authentication (2FA) is enabled, enter the code from your authenticator app.
Once logged in, you can access your profile, your tickets, your invoices, and continue shopping.

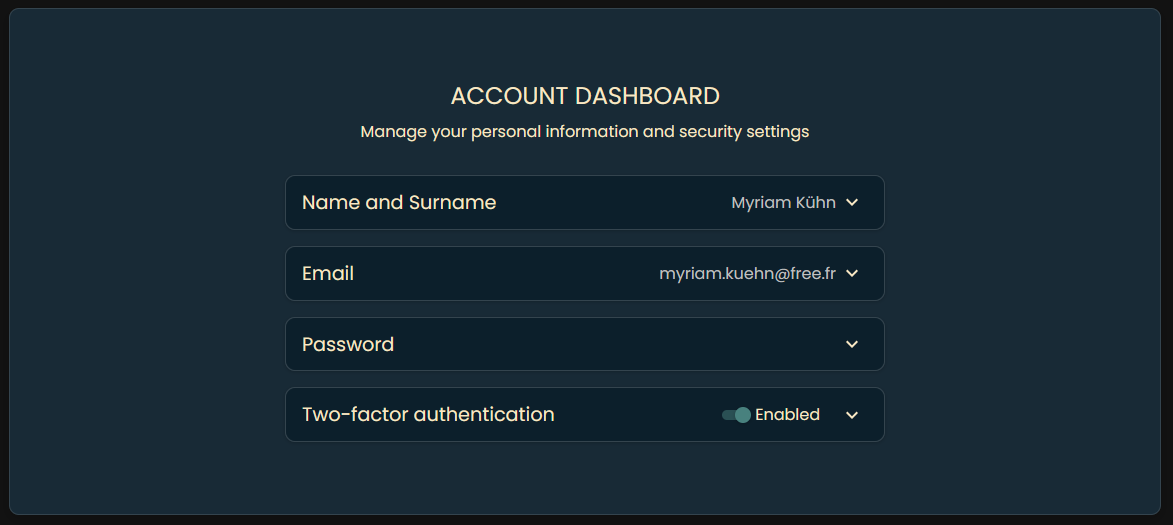
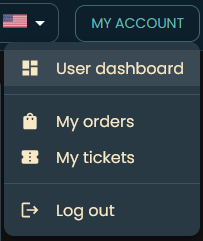
3.2 User Dashboard
After logging in, you will be redirected to your dashboard.
Here you can view and update your personal information.
You can change your first and last name.
Orders placed before you update your name will still be addressed to the previous name.
You can also update your email address.
If you change your email, you’ll receive a verification link (valid for 1 hour) and a cancellation link (valid for 48 hours) in case you did not request the change.
Finally, you can change your password by providing your current password and choosing a new one.
Your new password must be at least 15 characters long and include one uppercase letter, one lowercase letter, one number, and one special character.
You can enable two-factor authentication here. Scan the QR code with your authenticator app (or enter the code manually). After enabling, you’ll receive recovery codes—please save them somewhere safe. You can use these codes to disable 2FA if you ever lose access to your authenticator app.
If you lose both your recovery codes and your authenticator app, you’ll need to contact support to disable two-factor authentication.
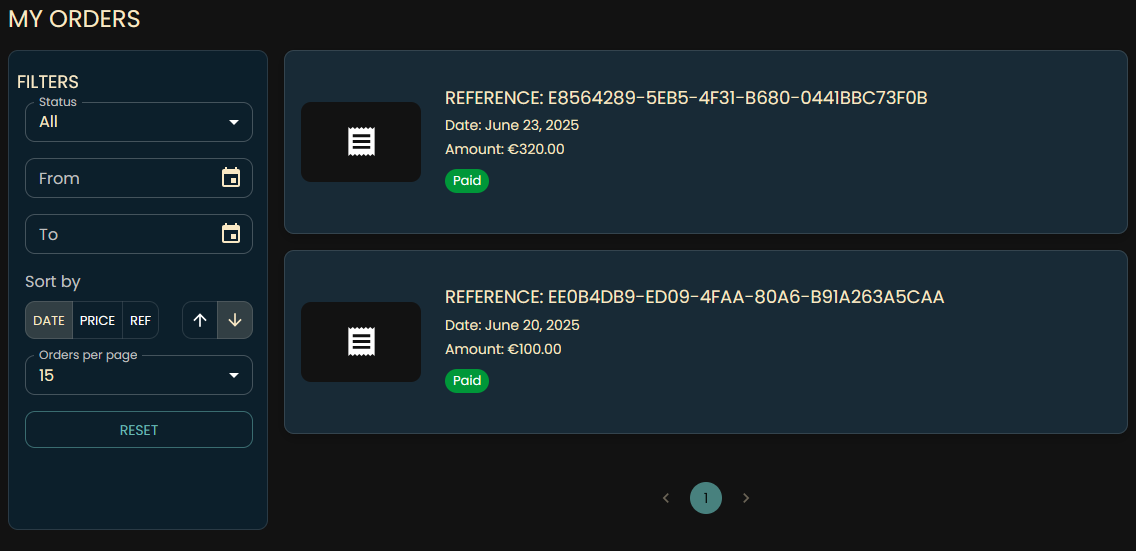
3.3 My Orders
In the “My Orders” section, you can view all your past and current orders.
Each order displays the date, total amount, and status (e.g., paid, pending).
Click the icon to download the invoice for that order.
You can only view orders placed with this account. You may filter orders by status, date, or reference number.
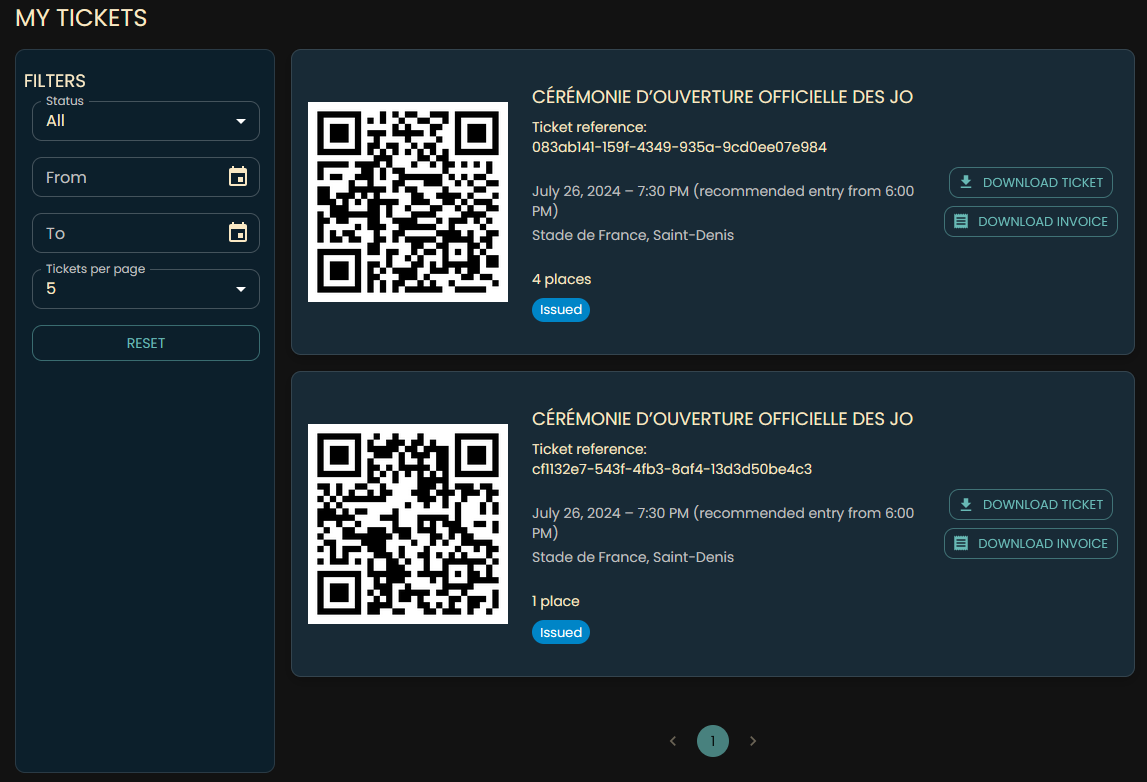
3.4 My Tickets
In the “My Tickets” section, you can view all tickets you’ve purchased.
Each ticket shows a QR code for event entry, the ticket reference, event name (always in the ordered language), date, time, location, seat information, and status.
You can also download the ticket and its corresponding invoice.
You can only view tickets purchased with this account. You may filter tickets by status and date.
3.5 Checkout
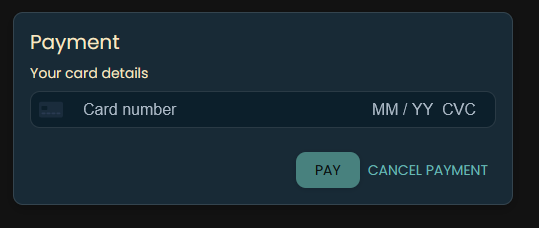
As a logged-in user, you can complete purchases. Go to your cart, accept the General Terms and Conditions of Sale, and click “Checkout”.
On the checkout page, enter your card information (Stripe test mode) and your ZIP code.
After providing your payment details, click “Pay” to finalize the purchase. Once complete, you’ll receive your tickets by email and can access both tickets and invoices in your dashboard.
For card payments you need a valid card number, expiration date, and CVC. The ZIP code is used for verification. For testing, you can use:
- Success: 4242 4242 4242 4242, exp. 12/35, CVC 253, ZIP 25365
- Decline: 4000 0000 0000 0002, exp. 12/35, CVC 253, ZIP 25365
After successful payment, you will receive a confirmation email with your tickets and invoice attached.
The amount of available tickets is updated in real-time. If an offer is sold out, you will not be able to add it to your cart.
3.6 Logout
To log out, click the “Logout” button in the navigation bar.
You will be redirected to the homepage and any “Remember me” session will be cleared. To access protected areas again, you’ll need to log in.
4. Admin
4.1 Sign In (with optional “Remember me” and 2FA via Google Authenticator)
As an administrator, you can sign in to access your profile, manage users, tickets, orders, payments, employees, and view reports.
Click the “Login” button in the navigation bar or on the login page. If you check “Remember me,” your session will persist for 7 days.
Enter your registered email address and password. If two-factor authentication (2FA) is enabled, enter the code from your authenticator app.
Once signed in, you’ll have access to your profile and all administrative interfaces.
Admins cannot order tickets; they don’t have access to the cart or the checkout page.
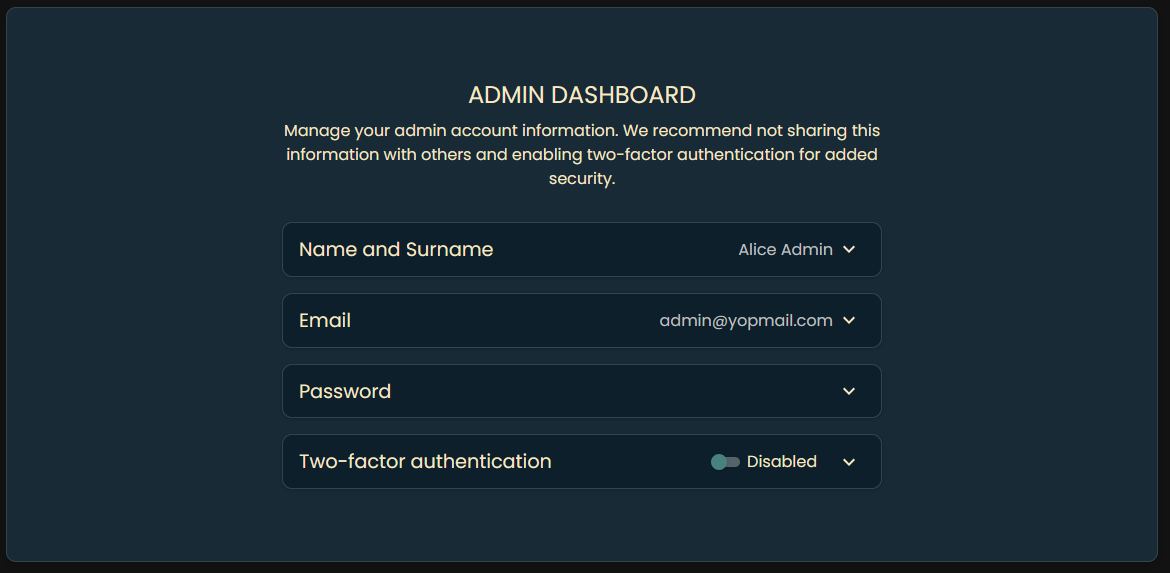
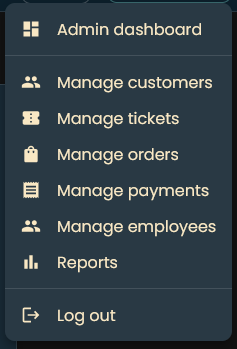
4.2 Admin Dashboard
After logging in, you’ll be redirected to the Admin Dashboard.
On this page, you can:
- View and update your first and last name.
- Change your email address.
- Reset your password—enter your current password, then choose a new one.
There is currently only one administrator account.
When you update your email, you will receive a verification link (valid for 1 hour) and a cancellation link (valid for 48 hours) in case you did not request the change.
Your new password must be at least 15 characters long and include one uppercase letter, one lowercase letter, one number, and one special character.
You can also enable two-factor authentication by scanning the displayed QR code with your authenticator app (or by entering the code manually). After activation, you will receive recovery codes—store them securely. These codes let you disable 2FA if you lose access to your authenticator app.
If you lose both your recovery codes and your authenticator app, contact developper to disable two-factor authentication.
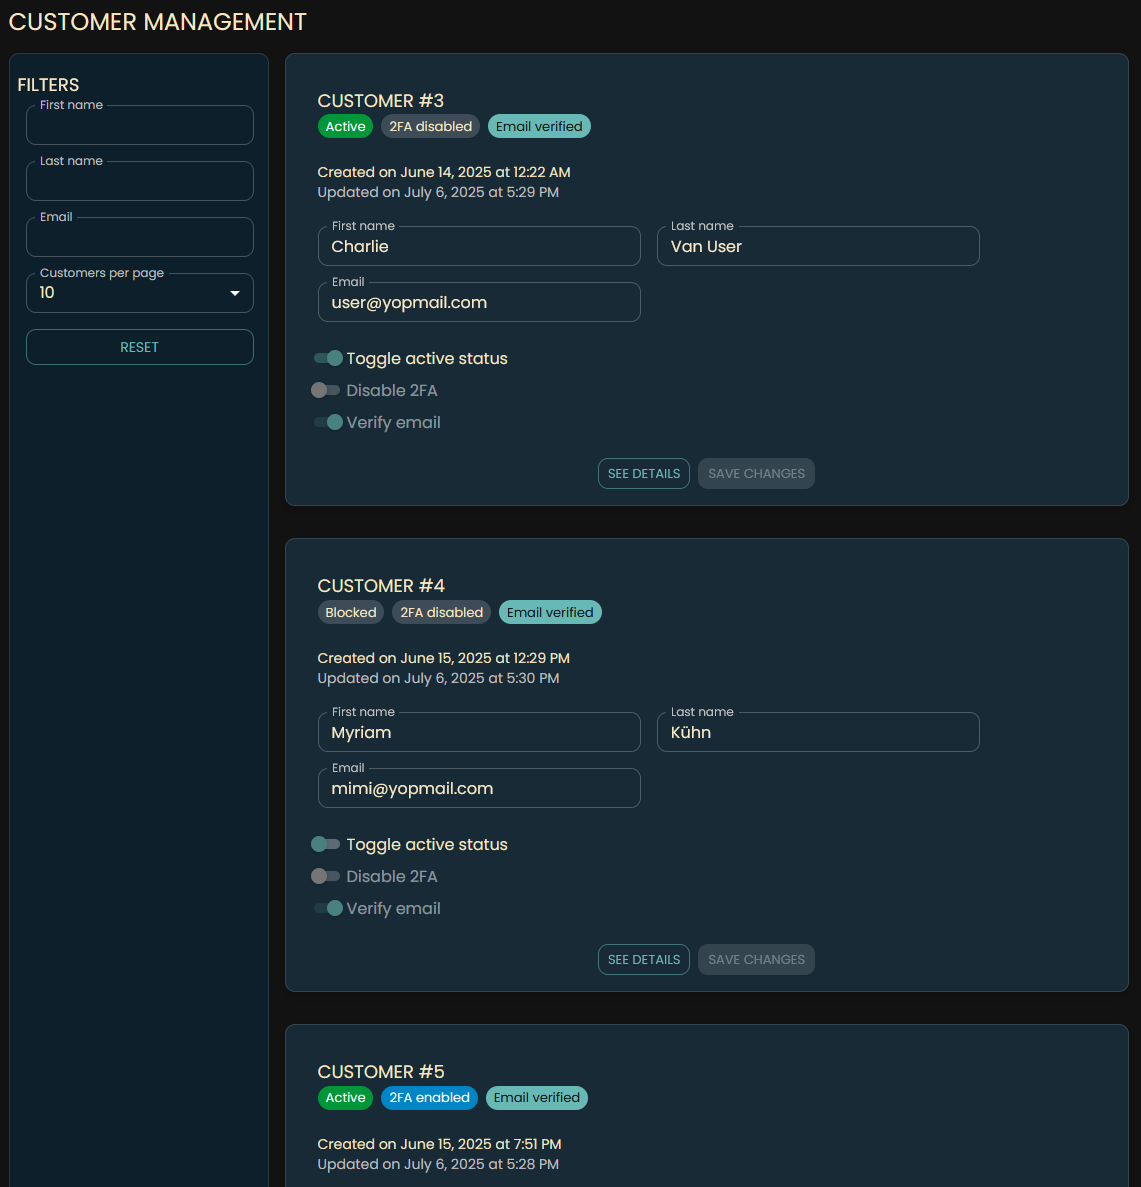
4.3 Manage customers
Each user record shows their name, email, registration date, last update date, and status (active/inactive, 2FA enabled/disabled, email verified or not).
You can edit a user’s first name, last name, and email address.
Changing a customer’s email as an admin does not trigger a verification email.
You can toggle a user’s active status.
An inactive user cannot sign in.
You can disable 2FA for an user but cannot enable it on their behalf.
You can manually mark a user’s email as verified if they experienced delivery issues.
Click the “See Details” button next to a user to view their full name, current email, and any pending email changes.
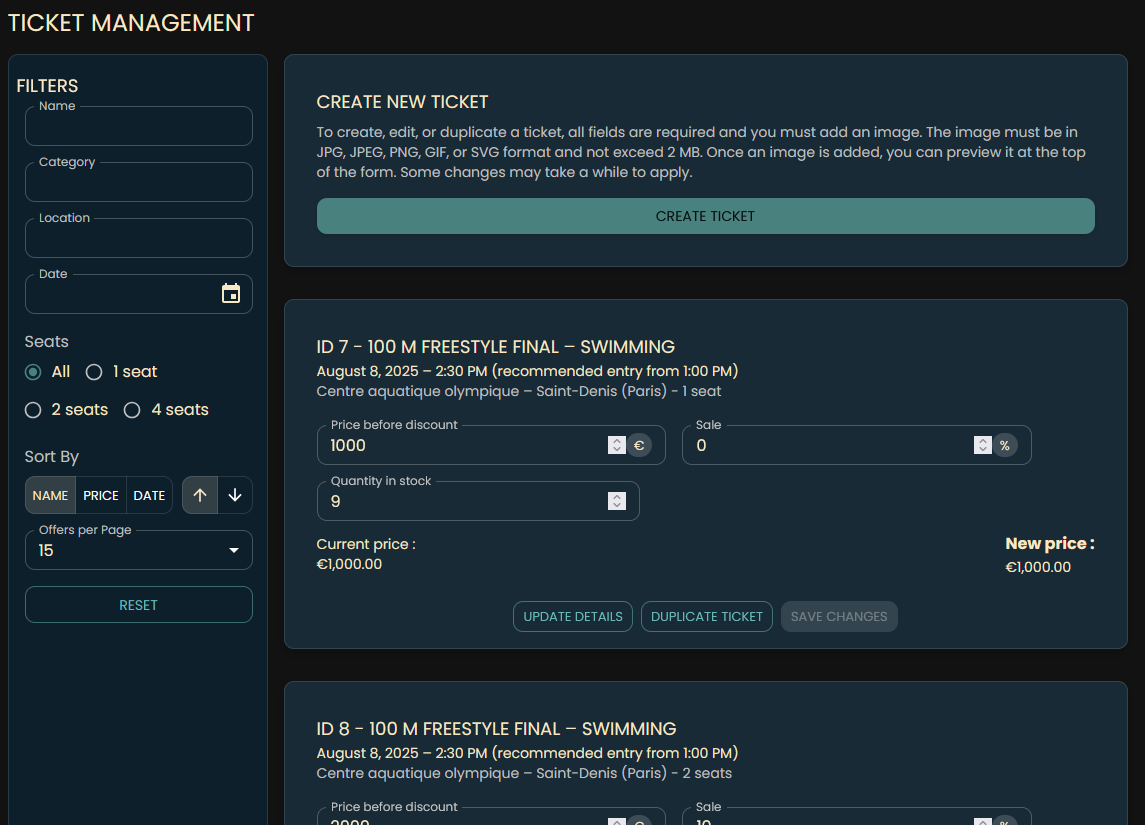
4.4 Manage tickets
Under “Manage Tickets,” you can see all tickets, including those with zero stock.
You can update the available quantity, adjust the price, or modify the sale percentage.
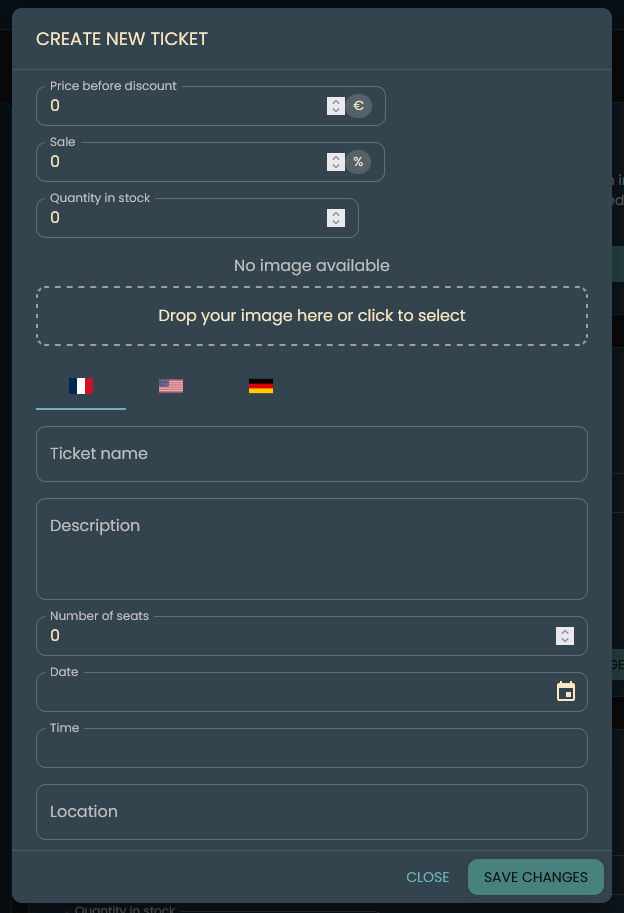
You can create a new ticket by clicking “Create Ticket.”
Create Ticket
Click the “Create Ticket” button.
Complete all required fields in all supported languages: name, description, price, and available quantity.
Upload an image (JPG, JPEG, PNG, GIF, or SVG; max 2 MB).
When finished, click “Save Changes” to add the ticket.
Modify Price, Sale, or Quantity
In the ticket list, edit the price, sale percentage, or quantity directly.
Click “Save Changes” to apply your updates.
Updates may take a few moments to appear on the live site.
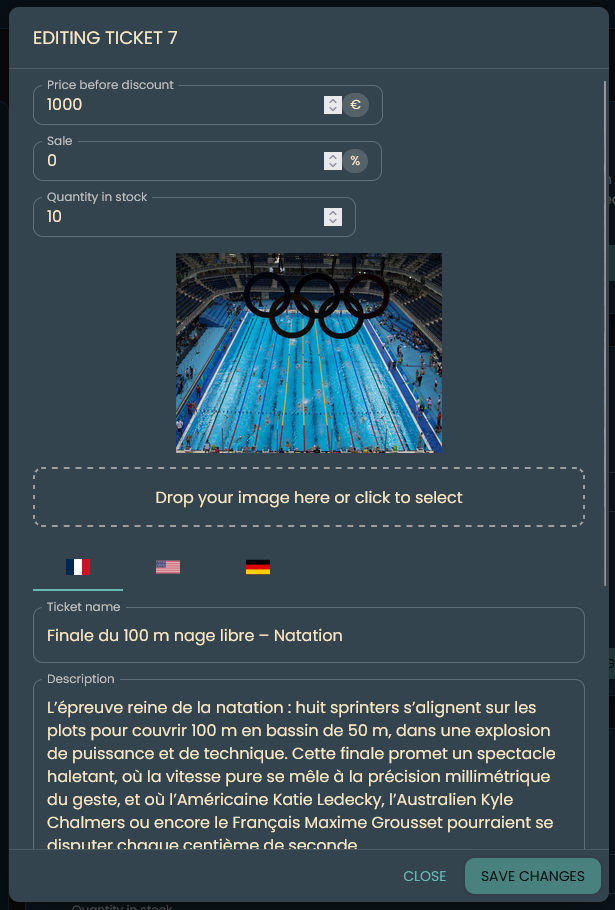
Update Ticket Details
Click “Update Details” next to the ticket you wish to modify.
You can change any field, and you do not need to re-upload the image if it remains the same.
Click “Save Changes” to commit your edits.
All fields are required. The image must meet the same format and size constraints.
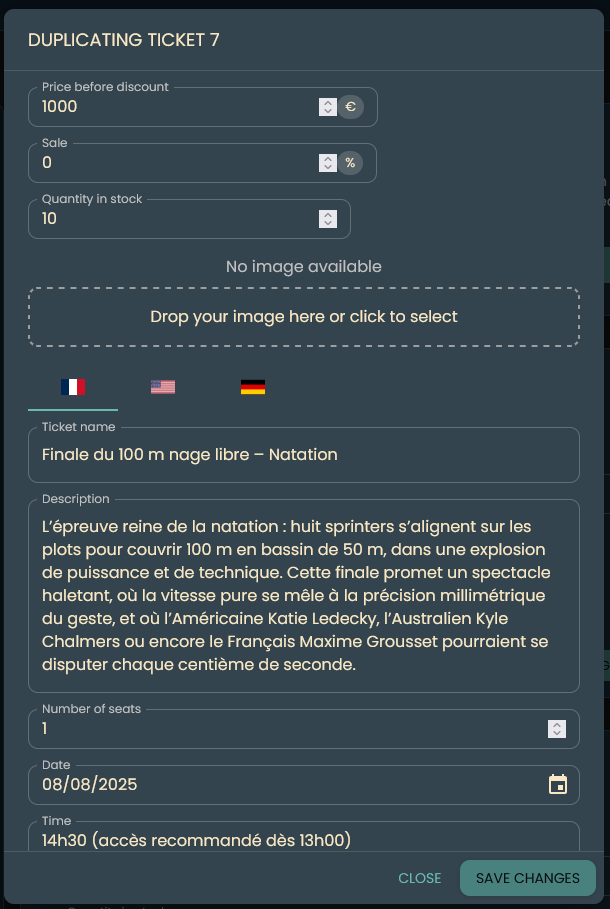
Duplicate Ticket
Click “Duplicate Ticket” next to the ticket you want to copy.
A new ticket with the same details will be created for you to modify.
This speeds up creating similar tickets.
Delete Ticket
You cannot delete a ticket directly; set its available quantity to 0 instead.
The ticket will no longer appear on the site or be purchasable.
4.5 Manage orders
In the “Manage Orders” section, you can view all orders.
Each order displays the QR code, ticket ID, payment status, ticket name (always showed in users language), date, time and location, the paid price, the purchase date, and—if applicable—the used, refunded or cancelled date, as well as the status (e.g., used, issued).
You can filter orders by status or by customer using the customer dropdown.
You can download the ticket and the invoice for paid tickets.
You can also change the status of any order if needed.
Statuses:
Issued (for unused tickets)
Used (when the ticket has been used)
Refunded (when the ticket has been refunded by an admin)
Cancelled (when the ticket has been cancelled by an admin)
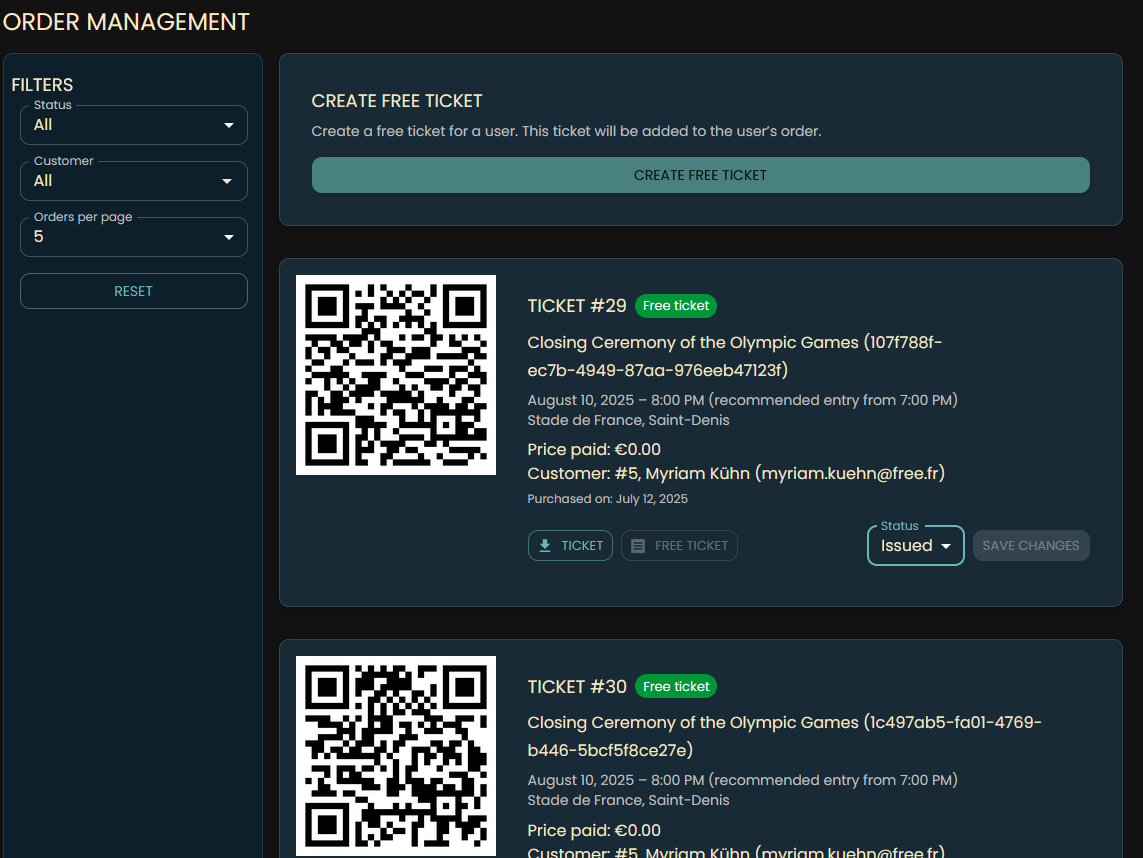
Create Free Tickets
Click the “Create Free Ticket” button to add a new free ticket.
Enter the customer ID, ticket ID, quantity, and select the user’s language so that the ticket and invoice are sent in the correct language.
Once all fields are completed, click “Create Free Ticket” to save.
Free tickets are not paid, so no payment information is required. The customer will receive the ticket by email, and it will appear in their account panel. The admin can preview the ticket to confirm the information before creating it. It is not possible to create a free ticket for an admin or an employee and if there are no tickets available. By creating a free ticket, the ticket is immediately decreased from the available quantity.
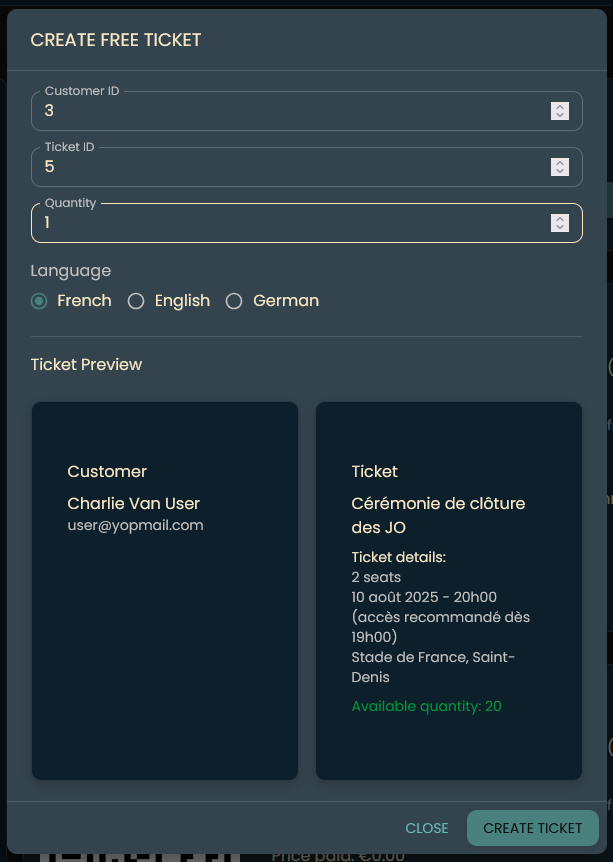
You can find the customer ID in the “Manage Customers” section and the ticket ID in the “Manage Tickets” section.
The number following “#” is the customer’s ID, and the number following “ID” is the ticket’s ID.
4.6 Manage payments
In the “Manage Payments” section, you can view all payments and invoices.
Each payment record shows:
- The payment UUID (a unique identifier for tracking transactions)
- Date
- Amount
- Status (paid, pending, failed, or refunded)
- Payment method (stripe, paypal, or free)
- Customer info
- Cart details
You can filter payments by status or method, and search by customer email or UUID.
You can also download each invoice:
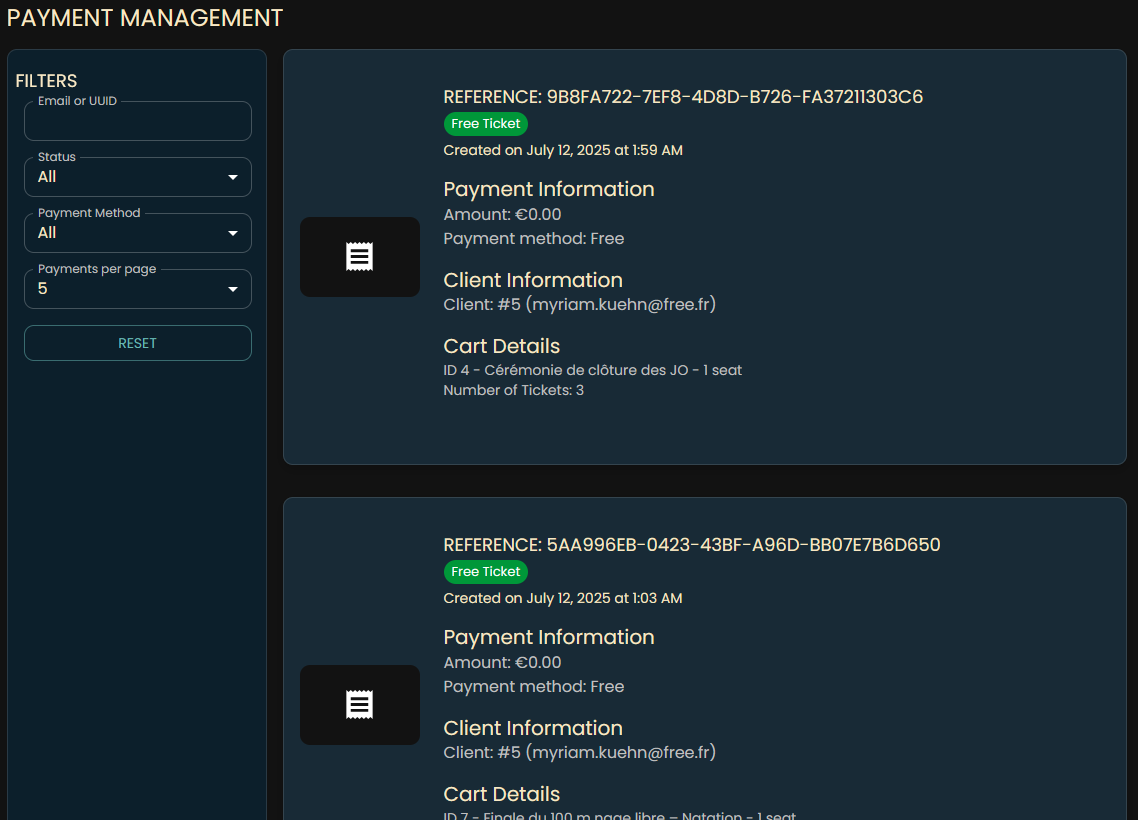
The status meanings:
- Paid – the payment was successful and the order is complete.
- Pending – the payment is still being processed.
- Failed – the payment did not go through (e.g., insufficient funds or payment error).
- Refunded – the payment was returned to the customer.
Currently supported payment methods are stripe, and free.
Refund a payment
To refund a payment:
- Enter the amount to refund (must be ≤ the original amount).
- Click the “Refund” button next to the payment.
You can only refund payments with status paid.
Refunds are not processed automatically by the payment provider. You must initiate the refund in your payment gateway, and then mark the corresponding ticket as refunded to invalidate it.

4.7 Manage employees
In the “Manage Employees” section, you can view all registered employees.
Each employee record shows their first name, last name, email address, registration date, last update date, and status (active/inactive, 2FA enabled/disabled, email verified or not).
You can edit an employee’s first name, last name, and email address.
Changing an employee’s email as an administrator does not trigger a verification email.
You can also toggle an employee’s active status.
If an employee is deactivated, they cannot sign in.
You can disable 2FA for an employee, but you cannot enable it on their behalf.
Finally, you can manually mark an employee’s email as verified if they experienced delivery issues.
Click the “See Details” button next to an employee to view their full name, current email, and any pending email change.
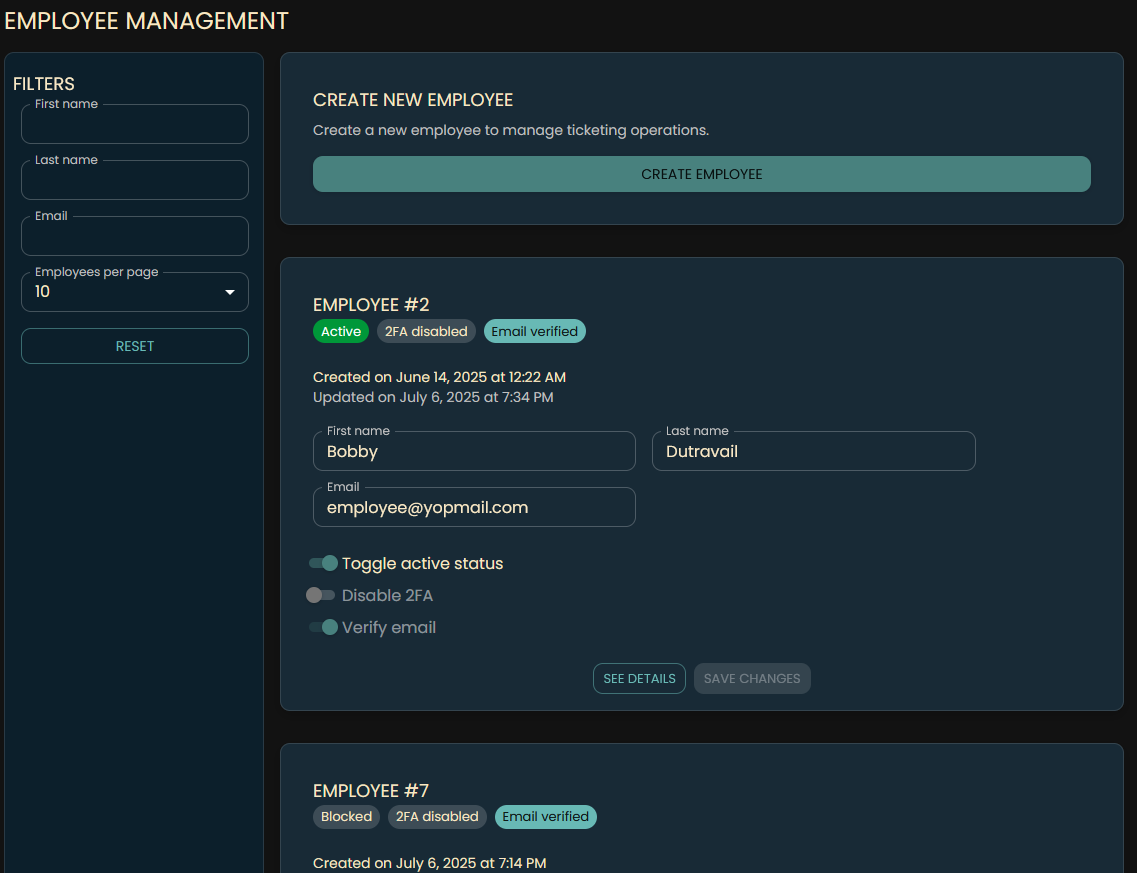
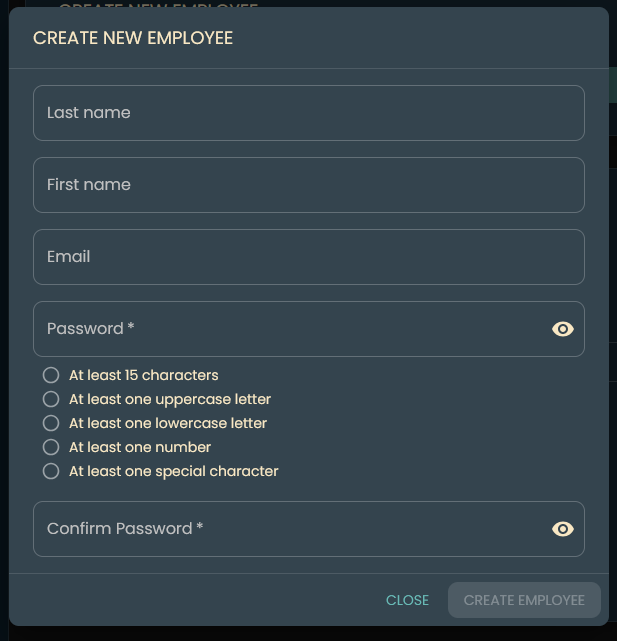
Create Employee
Click the “Create Employee” button to add a new employee.
- Enter the employee’s first name and last name.
- Provide a valid email address.
- Choose a secure password and confirm it.
Once all fields are completed, click “Create Employee” to save.
Passwords must be at least 15 characters long and include one uppercase letter, one lowercase letter, one number, and one special character. Newly created employees are automatically activated and their email is marked as verified.
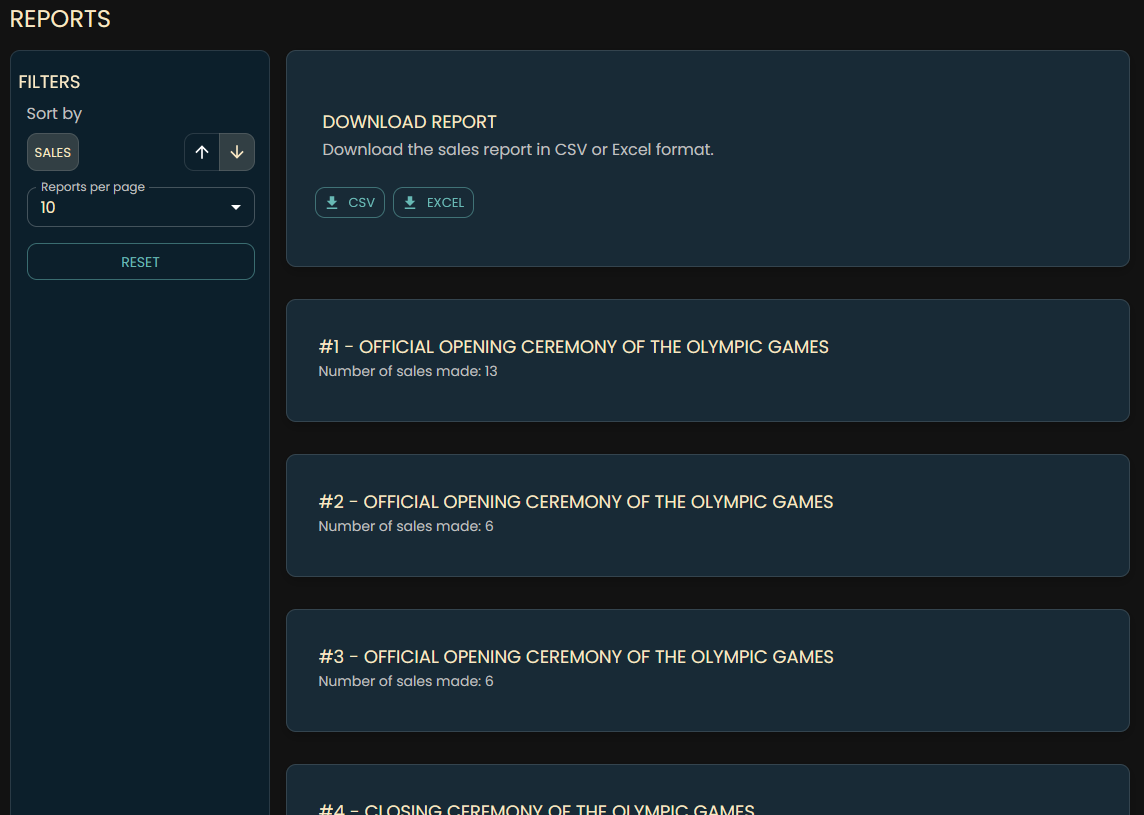
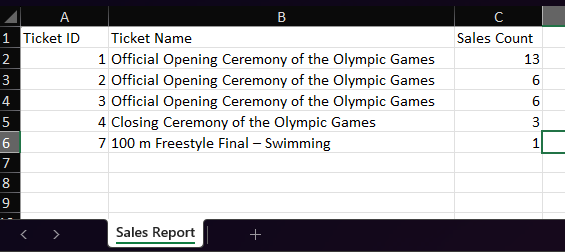
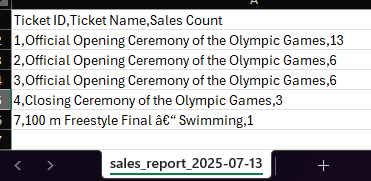
4.8 Reports
In the Reports section, you can view and download sales reports.
Reports are generated from your sales data and can be sorted by sale amount.
Each report includes:
- Ticket ID
- Ticket name
- Sale amount
Click the Download Report button to save the report as a CSV or Excel file.
The file and column headers are localized to your language, and the filename includes the current date.
4.9 Logout
To log out, click the “Logout” button in the navigation bar.
You will be redirected to the homepage and any “Remember me” session will be cleared. To access protected areas again, you’ll need to log in.
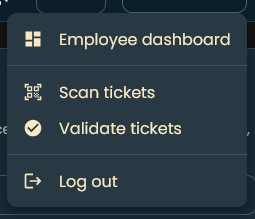
5. Employee
5.1 Sign In (with optional “Remember me” and 2FA via Google Authenticator)
As an employee, you can sign in to access your profile, scan and/or validate tickets.
Click the “Login” button in the navigation bar or on the login page. If you check “Remember me,” your session will persist for 7 days.
Enter your registered email address and password. If two-factor authentication (2FA) is enabled, enter the code from your authenticator app.
Once signed in, you’ll have access to your profile and all interfaces.
Employees cannot order tickets; they don’t have access to the cart or the checkout page.
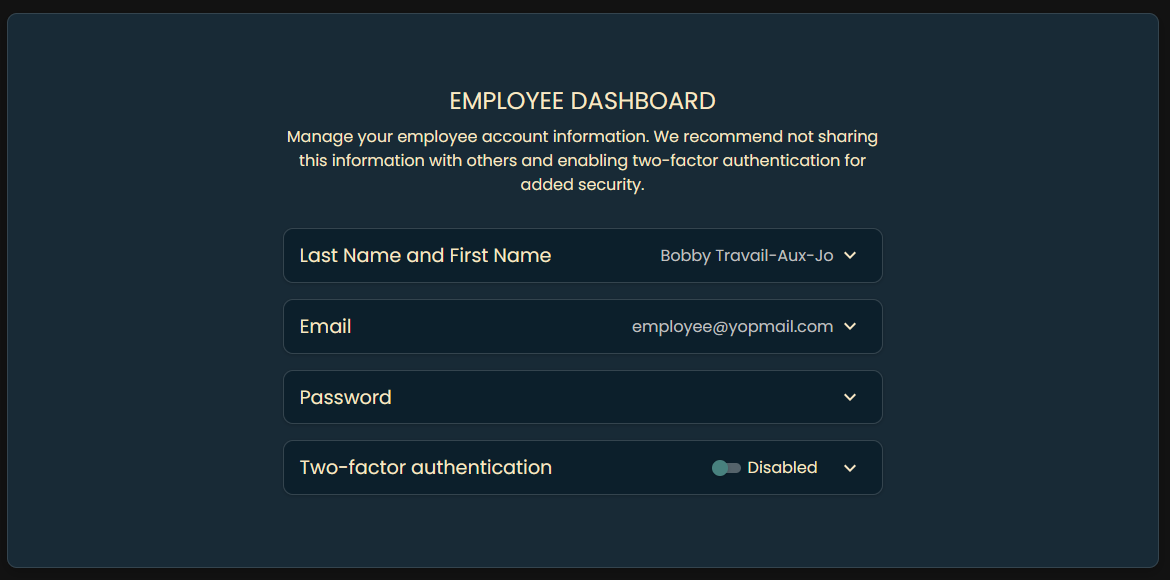
5.2 Employee Dashboard
After logging in, you’ll be redirected to the Employee Dashboard.
On this page, you can:
- View and update your first and last name.
- Change your email address.
- Reset your password—enter your current password, then choose a new one.
Employee Accounts can only be created by the admin.
When you update your email, you will receive a verification link (valid for 1 hour) and a cancellation link (valid for 48 hours) in case you did not request the change.
Your new password must be at least 15 characters long and include one uppercase letter, one lowercase letter, one number, and one special character.
You can also enable two-factor authentication by scanning the displayed QR code with your authenticator app (or by entering the code manually). After activation, you will receive recovery codes—store them securely. These codes let you disable 2FA if you lose access to your authenticator app.
If you lose both your recovery codes and your authenticator app, contact admin to disable two-factor authentication.
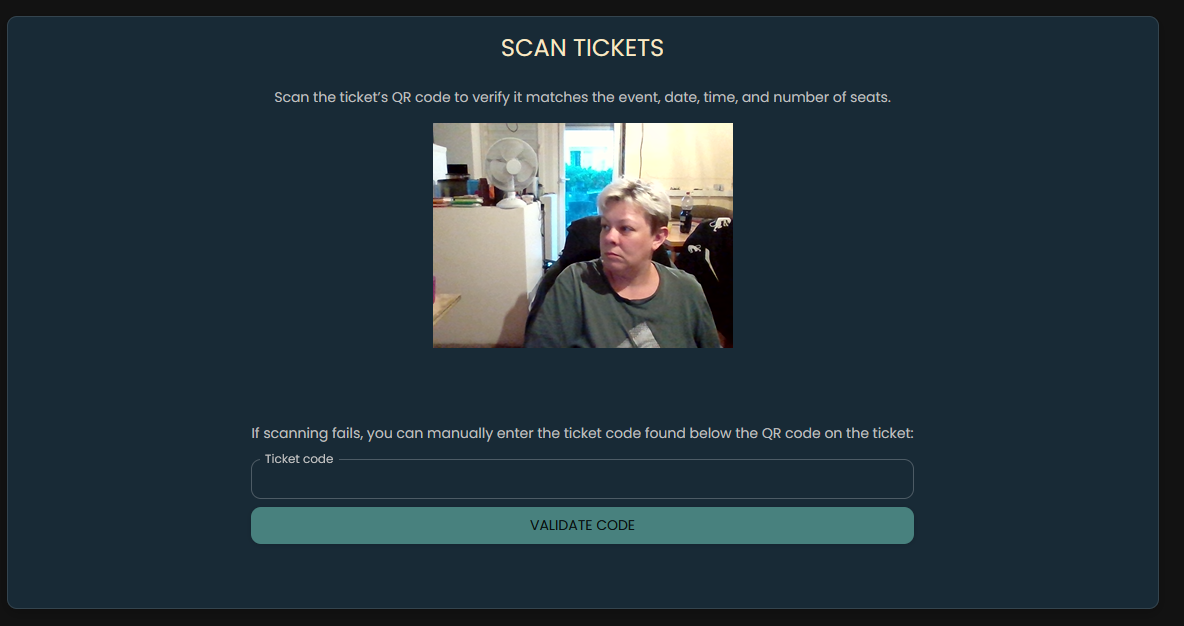
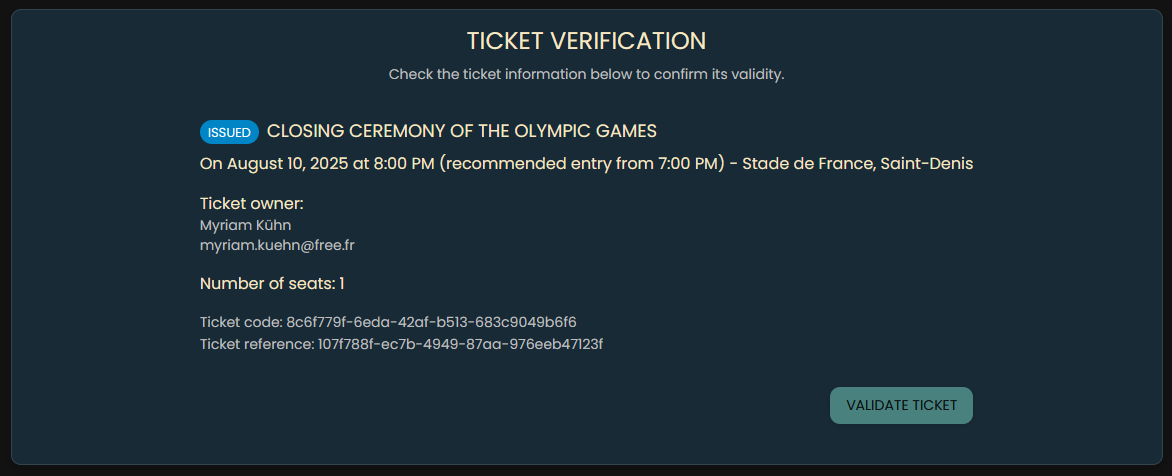
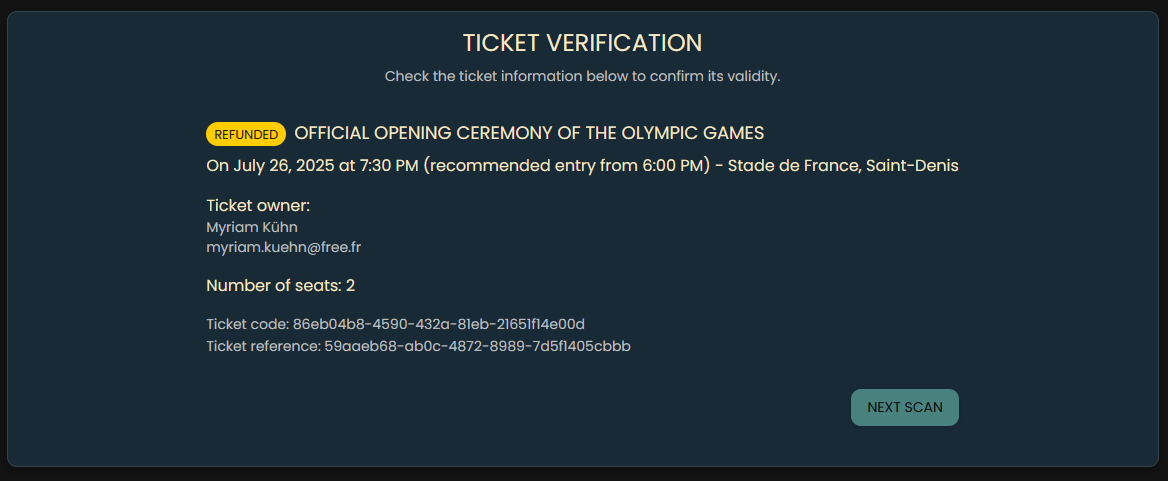
5.3 Scan Tickets
In “Scan Tickets,” you can scan a ticket’s QR code or enter its code manually.
To scan a ticket:
- Click the “Scan Ticket” button.
- Use your device’s camera to scan the QR code on the ticket.
- Review the ticket details—especially the event, date, time, and number of seats.
- Click “Validate Ticket” to mark it as used.
If scanning fails, you can enter the ticket code manually. It’s printed beneath the QR code on the PDF.
Once validated, a ticket cannot be reused.
If a ticket is already used, you’ll see an “already used” message.

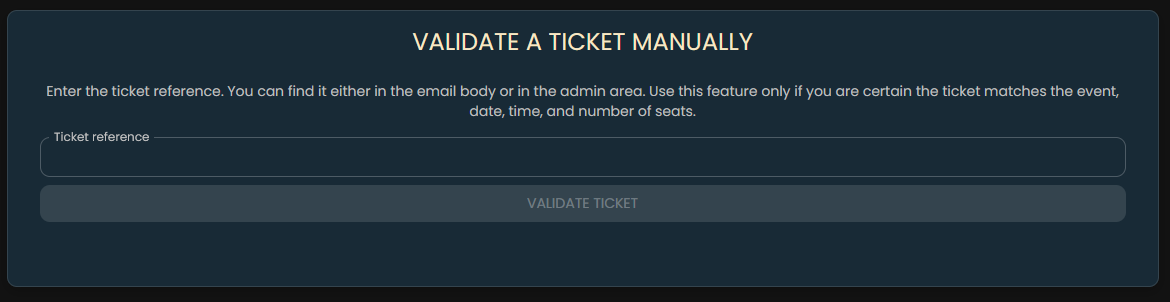
5.4 Validate Tickets
In “Validate Tickets,” you can manually validate unused tickets by entering their reference.
To validate a ticket:
- Click the “Validate Ticket” button.
- Enter the ticket reference in the field provided.
- Click “Validate.”
Only tickets with status “Issued” can be validated. Double-check before you proceed, as validation is final.
You can find the ticket reference in the email the user received or in the admin area.
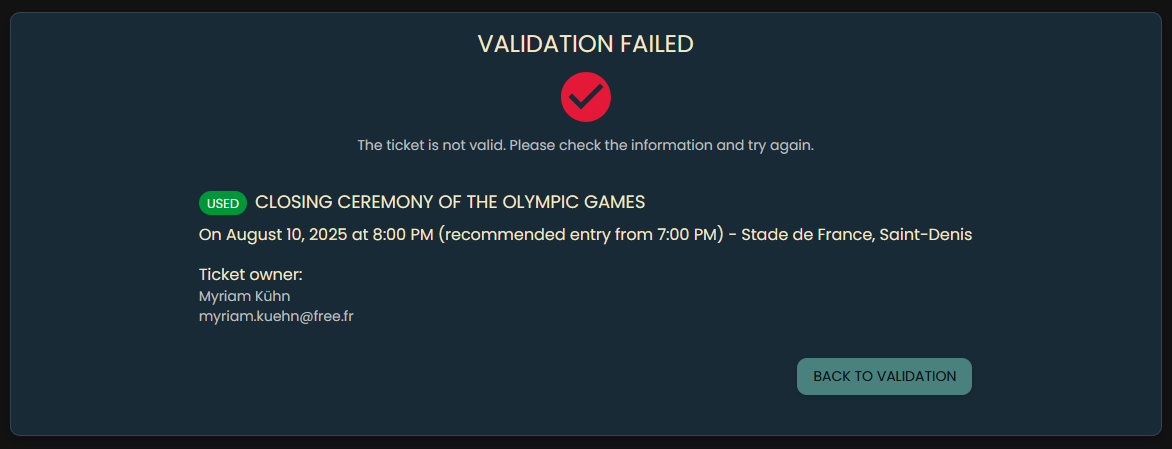
If the ticket is already used or invalid, you’ll see an error explaining why validation failed.
If valid, you’ll see a success message confirming the ticket is now validated.
5.5 Logout
To log out, click the “Logout” button in the navigation bar.
You will be redirected to the homepage and any “Remember me” session will be cleared. To access protected areas again, you’ll need to log in.